I Turned My WordPress Site into a Mobile App — Here’s What I Learned
If you’ve ever tried building an online community on your WordPress site, you know how hard it is to keep people engaged. At first, some members sign up and post a few updates, but before long, activity drops off and the community goes quiet. 📉
The issue isn’t your content or idea. It’s the experience. Most people don’t want to keep opening a browser just to see what’s new or reply to messages.
I wanted to fix this problem, so I tried BuddyBoss, a tool that can turn any WordPress site into a mobile app.
Within about an hour, I had the app fully configured and ready to submit to the app stores. It came with push notifications, instant messaging, and all the features members actually want to use.
The engagement boost was immediate and noticeable. And after seeing how well it worked, I’m confident it can help you get better results, too.
In this guide, I’ll show you exactly how to turn your WordPress website into an app, with no coding or technical skills required.

Note: The technical setup in this guide takes about an hour. Please keep in mind that getting your app live involves waiting for approval from Apple and Google. This can take several days, so it’s good to plan for that waiting time.
💡Quick Summary: What You Need to Turn Your WordPress Site into an App
In a hurry and just want the short version? Here’s what you’ll need:
- A WordPress community website (for example, a forum or membership site).
- The BuddyBoss App, which converts your site into native iOS and Android apps — no coding or developer required.
You can explore other methods like Progressive Web Apps (PWAs) or full custom app development, but those take more time and cost a lot more.
For most WordPress users, BuddyBoss is the fastest and most beginner-friendly solution.
Why Turn Your WordPress Community Website into a Mobile App?
Turning your WordPress community website into a mobile app can instantly boost engagement and keep members coming back.
Apps make it easier for users to stay connected, especially on their phones, where most online interactions happen today.
A mobile app outperforms a regular website because it offers:
- 🔔 Push notifications that let you reach members instantly with updates or messages.
- 📶 Offline access so that users can browse or read some content even without the internet.
- 📤 Easy content sharing to encourage more interaction and visibility.
- 🎯 Personalized in-app experiences that make your community feel more dynamic
Let’s see how a mobile app compares to a standard website and why it makes such a big impact:
| Feature | Website | Mobile App | Where an App Wins |
|---|---|---|---|
| Access | Browser-based | Installed on mobile device | Always visible on the home screen. |
| Offline Use | ❌ | ✅ (Limited) | Users can read content anytime. |
| Push Notifications | ✅ | ✅ | App notifications are more powerful. They appear on the user’s lock screen and don’t require a web browser to be open. |
| Engagement | Moderate | High | Builds loyalty and retention. |
| Setup Cost | 💲 | 💲💲 | Apps need setup, but deliver a stronger ROI. |
Key takeaway: If your site isn’t getting much activity, then turning it into a mobile app can increase engagement. Plus, you get to boost retention and build stronger loyalty across your membership, social, or eLearning platform.
Different Ways to Build a WordPress App (and the One That Works Best)
There are several ways to turn your WordPress site into a mobile app, but not all of them are beginner-friendly or worth the effort.
After testing different methods, I found that BuddyBoss App offers the best balance of simplicity, features, and results.
Here’s a quick look at your options and what to expect from each:
| Method | Difficulty | Cost | Trade-Off | Best For |
|---|---|---|---|---|
| BuddyBoss App | Easy | 💲💲 | Requires a subscription | Communities, memberships, eLearning |
| PWA (Progressive Web App) | Easy | 💲 | Limited store availability and fewer features | Blogs, portfolios |
| Native App Development | Advanced | 💲💲💲💲 | Requires developers; expensive | Custom projects |
Why I Recommend BuddyBoss App


BuddyBoss is the most powerful WordPress community platform out there. It’s built for creating membership sites, social networks, and online learning platforms, all in one place.
The BuddyBoss App takes that experience to mobile. It lets you turn your WordPress site into a native iOS and Android app without writing any code. Everything, including your users, content, courses, and private messages, syncs automatically between your website and the app.
Here’s what makes it stand out:
- No coding required: The BuddyBoss team handles the entire app build for you.
- Instant syncing: Keeps your WordPress content, users, and features up to date in real time.
- Built-in community tools: Includes messaging, course integrations, and push notifications.
- Easy customization: Use the drag-and-drop builder to design your app’s look and layout.
In short, BuddyBoss App gives you all the benefits of a custom-built mobile app without the cost, complexity, or coding headaches.
✅Before You Begin: Setup Checklist + Costs
Before I show you how to turn your WordPress community into a mobile app, I want to make sure you’ve got everything ready. That’s why I’ve put together a checklist and a realistic breakdown of the main costs so you know exactly what to expect before getting started.
You’ll need the following before you begin:
💰 Cost Breakdown: How Much Does It Cost to Build a BuddyBoss Community App?
| Cost Type | Description | Amount |
|---|---|---|
| BuddyBoss Platform | To build your WordPress community site (one-time or annual license) | $299/year |
| Rapyd Hosting | Powerful hosting. Ideal for BuddyBoss | $29/month |
| BuddyBoss App Subscription | Gives you access to the app builder and publishing tools | $79/month |
| Apple Developer Account | Required to publish your iOS app | $99/year |
| Google Play Developer Account | Required to publish your Android app | $25 one-time fee |
If you haven’t built your community site yet, then take a look at our step-by-step tutorial on how to create your own private community in WordPress.
If you already have one, then your main new costs will just be the BuddyBoss App subscription and developer accounts.
While the BuddyBoss App subscription is a huge investment, it’s important to remember that hiring a developer to build an app costs thousands of dollars.
For most business owners, using a tool like BuddyBoss is a much faster and more affordable way to get a professional app.
How to Create a Mobile App Using BuddyBoss
Now that you have everything ready, let’s jump into the exact method I have tested for creating a community app from a WordPress website.
Step 1: Install and Connect the BuddyBoss App Plugin
Before your community can go mobile, you need to link your WordPress site to the BuddyBoss App. Think of it as connecting your website and mobile app so they can work together.
To do this, install and activate the BuddyBoss App plugin. Keep in mind that you can only access this tool after you purchase your BuddyBoss App subscription.
To get the BuddyBoss App, log in to your BuddyBoss account and switch to the ‘Downloads’ tab in the left column. Then, click the ‘Download’ button next to the plugin.
Once downloaded, you can install it on your WordPress site just like any other tool. For details, see our tutorial on installing WordPress plugins.


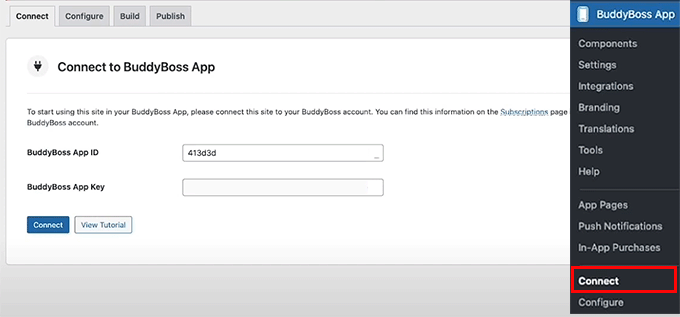
Upon plugin activation, head over to the BuddyBoss App » Connect page in your WordPress dashboard.
Here, you need to add your BuddyBoss App ID and App Key to connect the platforms.

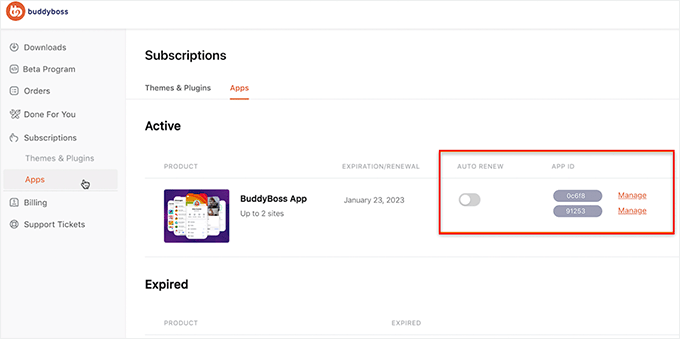
To find these, go back to your BuddyBoss account and switch to the ‘Apps’ tab.
Then, click the ‘Manage’ button next to the BuddyBoss App that you just downloaded.

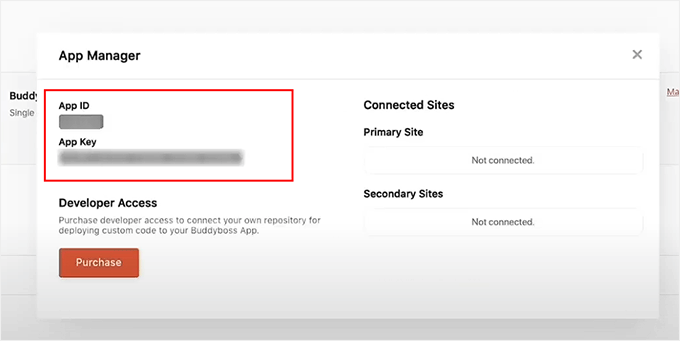
This will open a prompt showing your App ID and App Key.
Simply copy them and paste them into your WordPress dashboard to complete the connection.

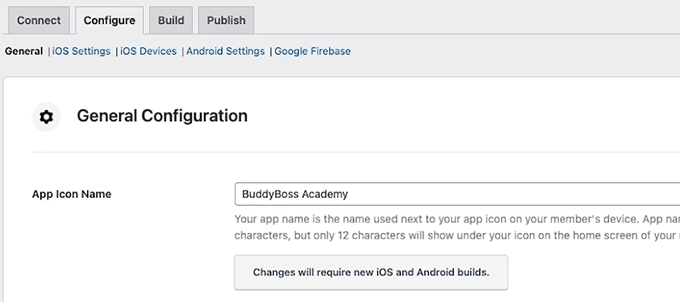
Once that is done, switch to the ‘Configure’ tab at the top.
Here, you can enter a name for your app in the ‘App Icon Name’ field. This is the title that will appear alongside your app icon in the Apple App Store and Google Play Store.
Choose a name that’s relevant, easy to remember, and instantly recognizable to your audience.

Step 2: Configure iOS Settings (Apple Developer Account)
Once your WordPress site is connected to the BuddyBoss App, it’s time to get your iOS settings ready. This step is important if you want your community app to appear in the Apple App Store.
Important: Keep in mind that you’ll be creating a few special codes called API keys, IDs, and secrets. Don’t worry, it’s easier than it sounds.
Think of these as unique digital passkeys that let your BuddyBoss app, your WordPress site, and the Apple App Store talk to each other securely.
If you only plan to create an Android app, you can skip this step.
1. Create an Apple Developer Account
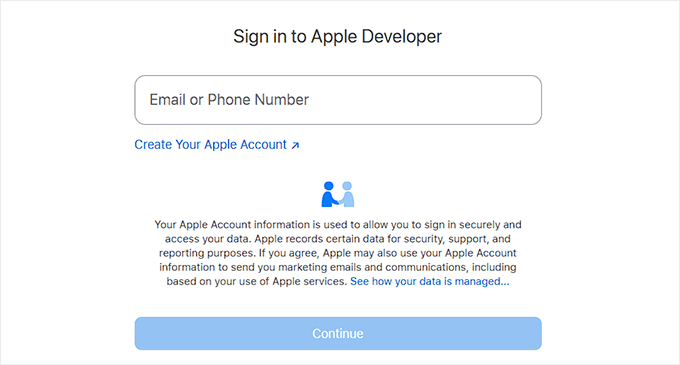
First, you need an Apple Developer Account. This lets you publish apps, manage updates, and access Apple’s tools.
I had to sign up myself when testing this method, and it’s pretty straightforward. You just need to follow the onscreen prompts to supply your personal details and contact details. Keep in mind that approval can take one or two days.

2. Connect Apple Developer Account to BuddyBoss
Next, you’ll connect your Apple Developer account to BuddyBoss. For that, go to the BuddyBoss App » Configure » iOS page from your WordPress dashboard.
Here, you’ll add your Issuer ID, Key ID, and upload the API key that you generate in Apple’s App Store Connect.
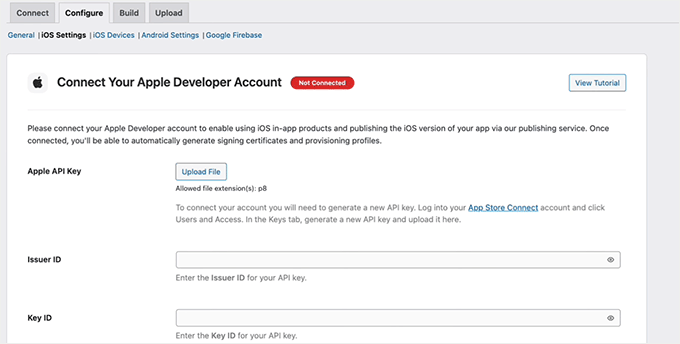

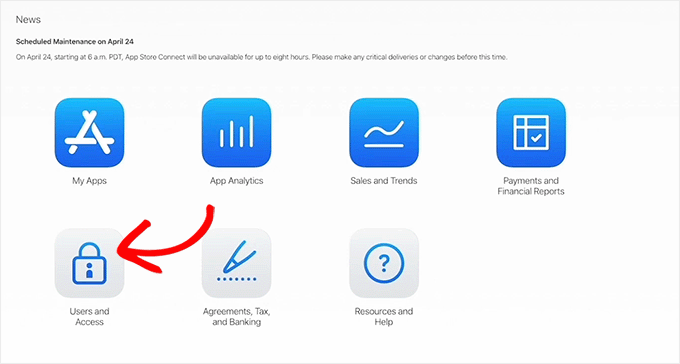
To get these, log in to your Apple Developer account and switch to ‘App Store Connect’ tab from the left column.
This will take you to a new screen where you have to click ‘Users and Access.’

On the next page, switch to the ‘Keys’ tab.
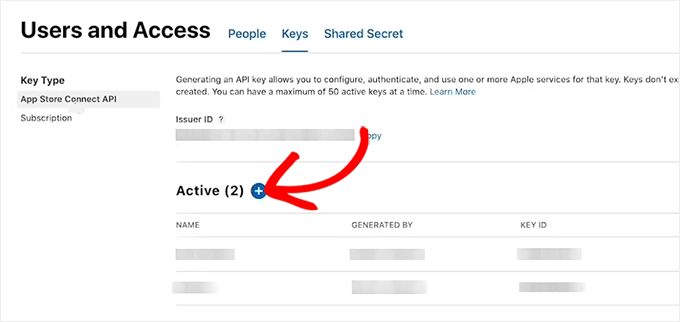
You’ll now see a list of active keys. Go ahead and click the + icon to create a new one.

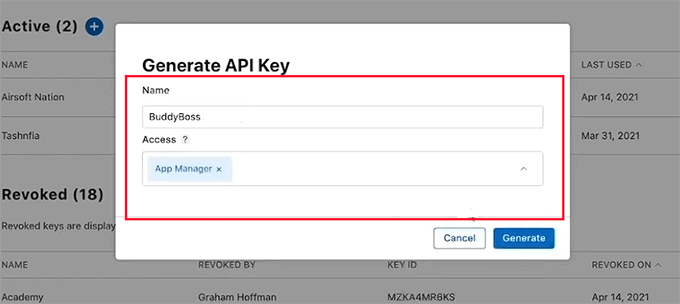
This will open a popup on your screen, where you can start by giving a name to your API key. I suggest using an easily identifiable title like “BuddyBoss” or the name of your app so you can recognize the API key if you ever want to edit or delete it.
After that, choose ‘App Manager’ from the ‘Access’ dropdown and click the ‘Generate’ button.

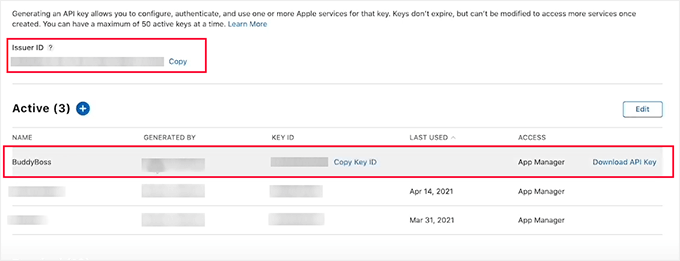
Upon generation, the API key will be displayed in the list of active keys. From here, click the ‘Download API Key’ button.
Then, copy the Key ID from the same row. You can also find the Issuer ID at the top of this page.

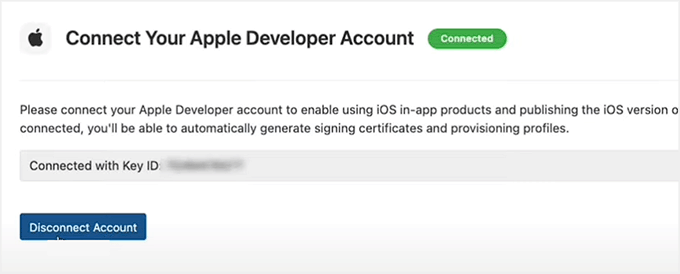
Now, go back to your WordPress dashboard and paste the Issuer ID and Key ID.
After that, upload the API key file, and click the ‘Connect Account’ button. Once this is done, your iOS account is linked to your BuddyBoss App.

3. Configure Bundle ID, Signing Certificates & Provisioning Profiles
Now you need to set up your Bundle ID, signing certificates, and provisioning profiles. These may sound technical, but here’s a simple way to understand them:
- Bundle ID is like your app’s passport — it gives it a unique identity.
- Signing certificates act as your digital signature to prove that the app was created by you.
- Provisioning profiles are like access passes that tell Apple which devices can install or test your app.
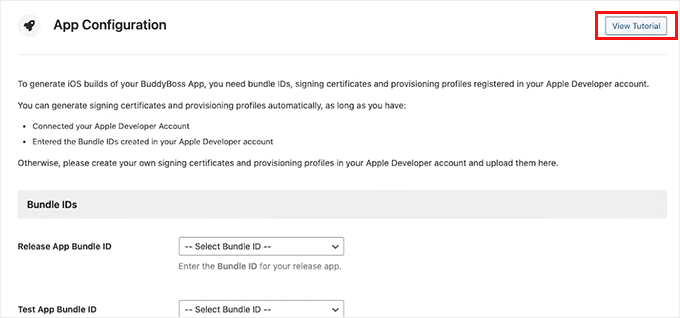
Thankfully, BuddyBoss simplifies this process by providing a video tutorial directly in your dashboard. It walks you step by step through adding all this information.
I found this super helpful when setting up my own app, as it guides you exactly where to click and what to enter.

4. Create Your App in App Store Connect
After completing that, you’ll need to add your app information. Go to your Apple developer account and switch to the App Store Connect » My Apps page.
Once you are on the new screen, click the + icon to create a new app.
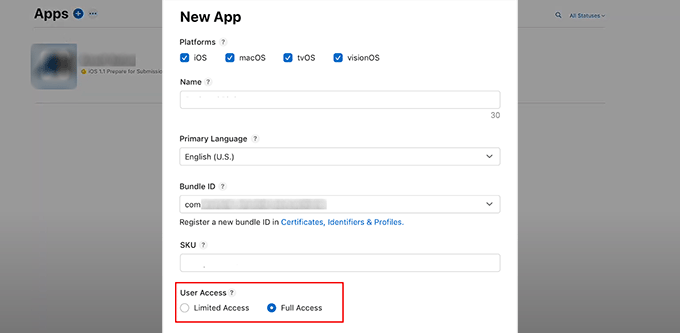
A popup will now appear, where you must enter the app name, select iOS as the platform, choose a primary language, and add your Bundle ID.
You also have to set user access to Full Access. Then, simply click the ‘Create’ button.

5. Add App ID and Shared Secret in BuddyBoss
Once your app is created, click on it to open its settings on the page.
From here, switch to the ‘App Information’ tab and copy your App ID.


Then, switch to the ‘Manager’ tab from the left column.
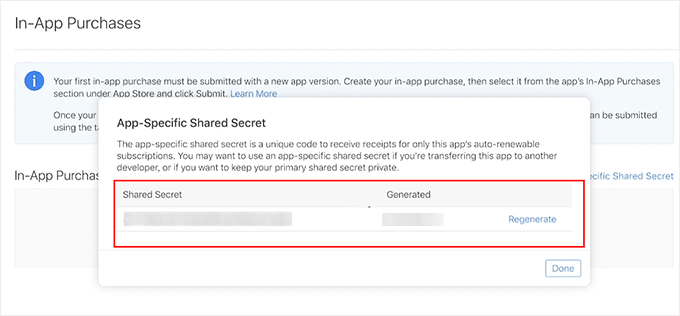
Go ahead and click the ‘App-Specific Shared Secret’ button. This will open a prompt from where you can easily generate and copy the key.

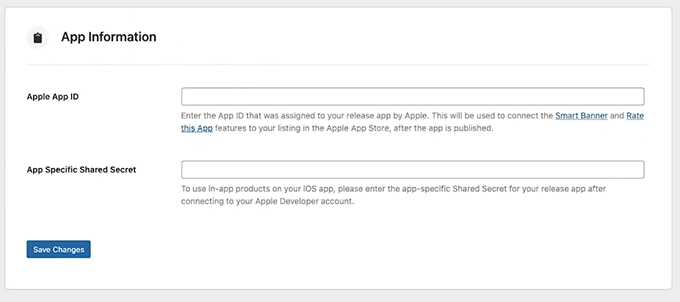
After that, paste your App ID and App-Specific Shared Secret into your WordPress dashboard, and click ‘Save Changes.’
6. Register Your iOS Device for Testing
Once that is done, it’s time to add your iOS device.

This step is important because registering your iPhone or iPad with Apple lets you test the app on a real device before it goes live.
Without this, you can’t make sure everything works properly for your community members.
Simply switch to the ‘iOS Devices’ tab in your BuddyBoss dashboard. Here, you’ll need to register your iOS device in your Apple Developer account.


BuddyBoss makes this easier by providing a step-by-step video tutorial right in your dashboard.
You can follow this guide to register your device and ensure everything is set up correctly for testing.
Step 3: Set Up Android Configuration (Google Play Console)
If you want your app to be available on the Google Play Store, then you’ll also need to configure your Android app settings in BuddyBoss. Start by switching to the ‘Android Settings’ tab at the top of your BuddyBoss dashboard.
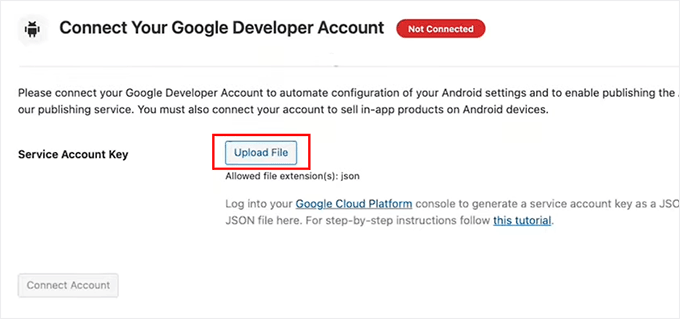
Here, you’ll need to upload your Service Account key. It will connect your Google Developer account to BuddyBoss so your app can sync correctly.

1. Create Your App in Google Play Console
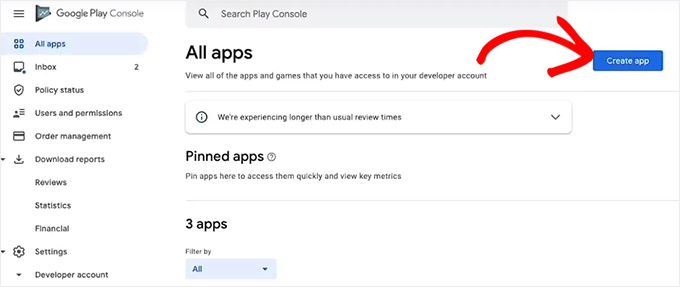
To do this, go to your Google Play Developer Account dashboard.
Here, click the ‘Create app’ button to start building your app.

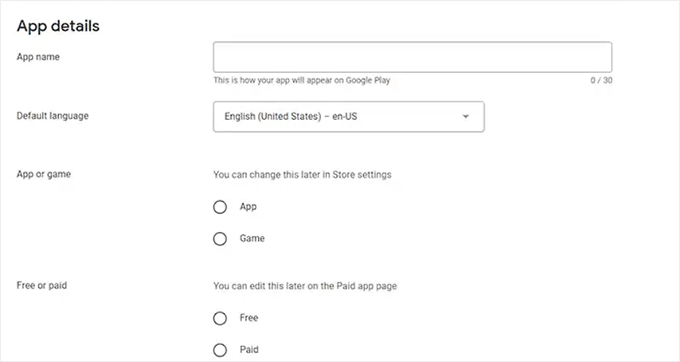
You’ll now be taken to a new screen where you have to give your app a name — this title will appear on Google Play, so make it clear and recognizable.
Next, choose the default language for your app and set it to ‘Free’ so everyone can download it. If you ever want to start earning from your app, you can easily change these settings later.
After checking the declarations boxes, click ‘Create App.’

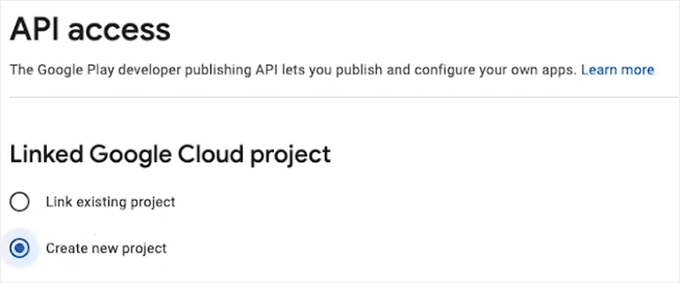
Once your app is created successfully, go to the Settings » API Access page from the left column and select the ‘Create New Project’ button.
Go ahead and click the ‘Link Project’ button at the bottom of the page.

2. Create Your Service Account in Google Cloud Platform
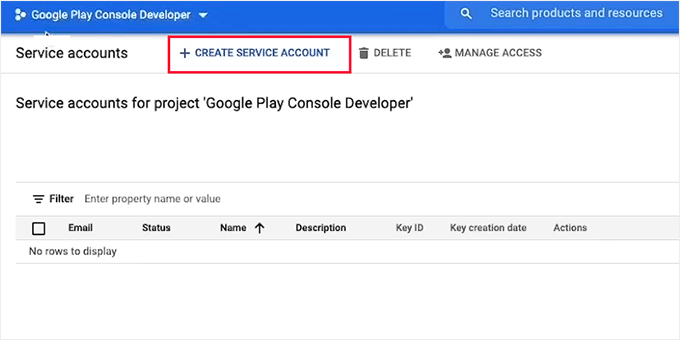
To create the service account, first log in to your Google Cloud Platform dashboard. Once you are there, switch to the ‘Service Accounts’ tab in the left column.
Go ahead and click the ‘+ Create Service Account’ button.

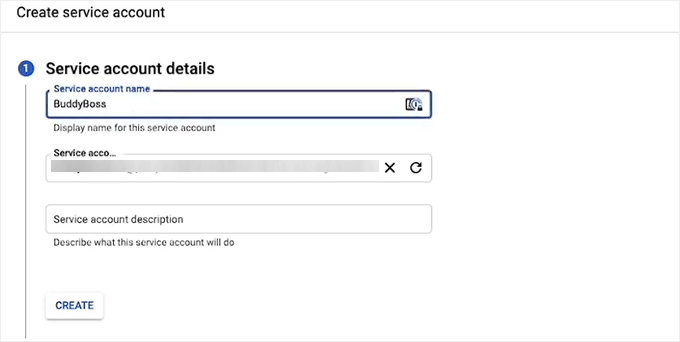
Once you are on a new page, give your account a name (I recommend using your app name), and add a description if you want.
Then, click the ‘Create’ button.

In the next step, you must select the user roles that will have access to this service account.
Simply select Owner, then click Continue. Finally, click the ‘Done’ button.


3. Generate and Download the JSON API Key
Your account will be created and shown in a row on the Service Accounts page. Now it’s time to build an API key for it.
To do this, just click the three-dot icon under Actions and select ‘Manage Keys.’
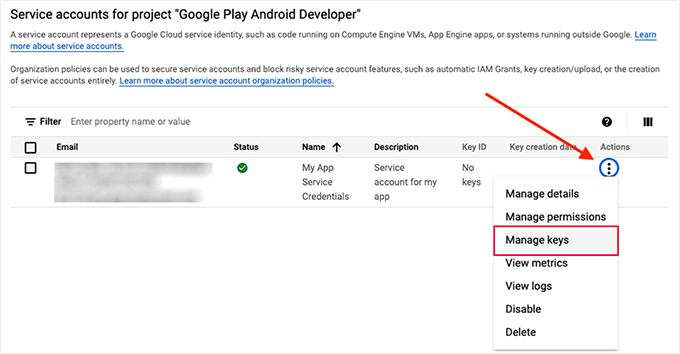

This will take you to a new screen where you have to click the ‘Add Key’ button.
Once a prompt opens up, choose ‘JSON’ as your key type and click the ‘Create’ button. Upon creation, your JSON key will automatically download to your computer.


4. Connect JSON Key With BuddyBoss
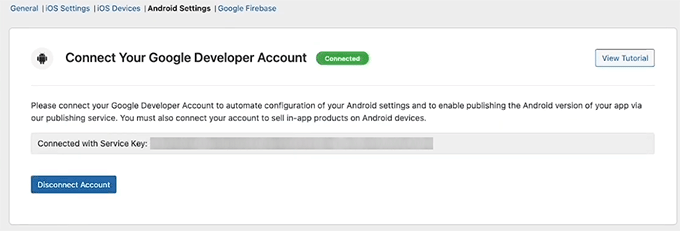
Now go back to your WordPress dashboard and upload this JSON key to the Service Account Key field.
This will easily connect your Google Developer Account with BuddyBoss.

5. Add Application ID
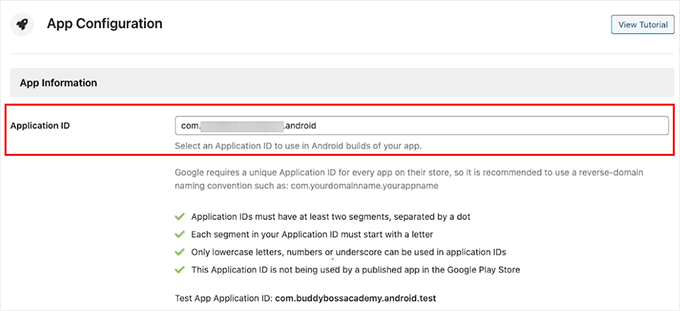
Once you have successfully connected, scroll down to add your Application ID. This is a unique identifier for your app — think of it like your app’s official ID in the Google Play Store.
You’ll need to type it yourself, and it must follow a standard ‘reverse domain name’ format. This usually looks like com.yourcompany.yourappname.
For example, if your company is ‘My Awesome Community’, you might use com.myawesomecommunity.app.
Ensure your app follows the criteria listed in the app configuration section to enable Google Play to recognize it correctly.

6. Generate KeyStore and Complete Setup
Next, you’ll add your KeyStore information. It is like a digital certificate for your app that proves you are the owner and ensures any future updates are recognized as coming from you.
Without it, Google Play won’t allow updates to your app.
With BuddyBoss, you can easily add your KeyStore information. Just click the ‘Generate KeyStore’ button under the Import section.
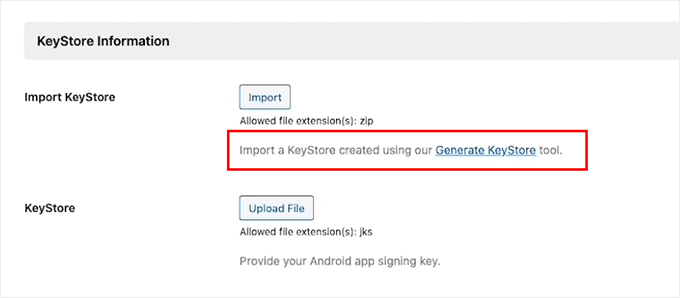

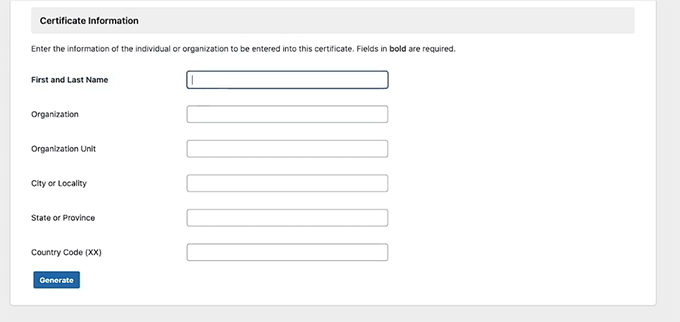
You will be directed to a new page where you have to scroll down to the ‘Certificate Information’ section.
Fill in your first and last name, your organization (you can use your app name), and any other required info. Then click ‘Generate’.

Once your KeyStore is created, download the file to your computer.
Go back to the KeyStore section in BuddyBoss, upload the file, and click the ‘Save Changes’ button. Your Android developer account is now fully connected with BuddyBoss.


Step 4: Configure Firebase to Send Push Notifications With Your App
One of the best ways to keep users coming back to your app is through push notifications. They’re those little reminders that let your community know about new posts, messages, or events.
To make this work on both iOS and Android, you’ll need to integrate your BuddyBoss app with Google Firebase. It is a free tool from Google that handles real-time push notifications.
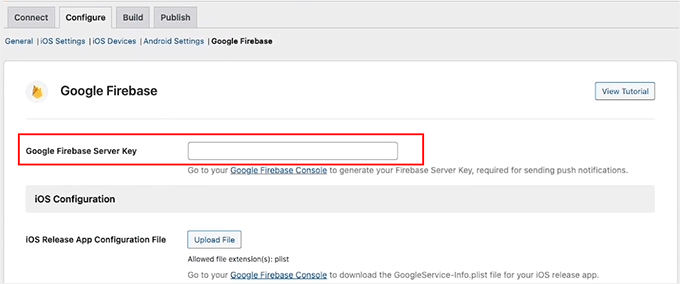
First, switch to the Google Firebase tab from the top of your BuddyBoss dashboard. You’ll now need to add your Firebase Server Key to connect it with your BuddyBoss App.

1. Create Your Firebase Project
To get that key, go to the Firebase Console and create a free account.
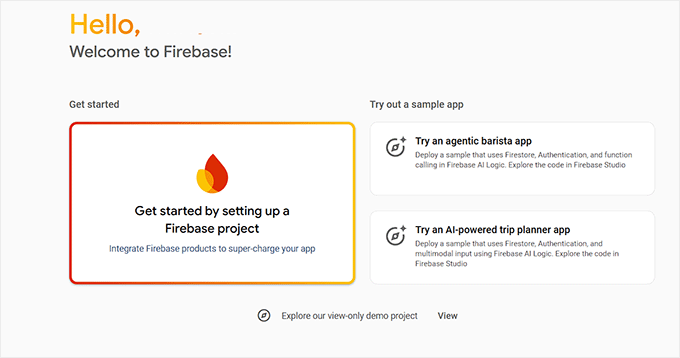
Once you do that, click the ‘Get started by setting up a Firebase project’ button.

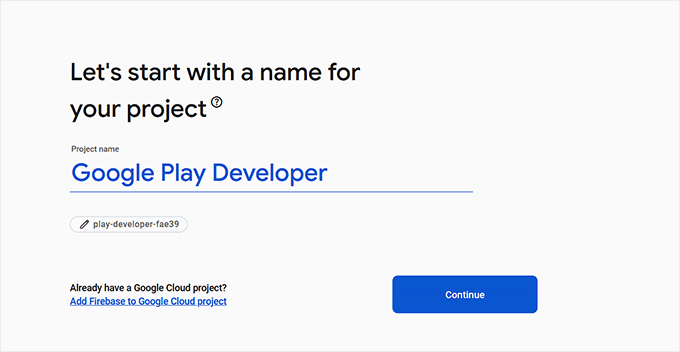
Firebase will now ask you to name your project. I recommend using your app’s name so you can easily recognize it later. Then, click ‘Continue.’
Next, Firebase will ask if you want to enable Google Analytics for this project. This can be handy if you want to track app usage.

2. Access Firebase Cloud Messaging Settings
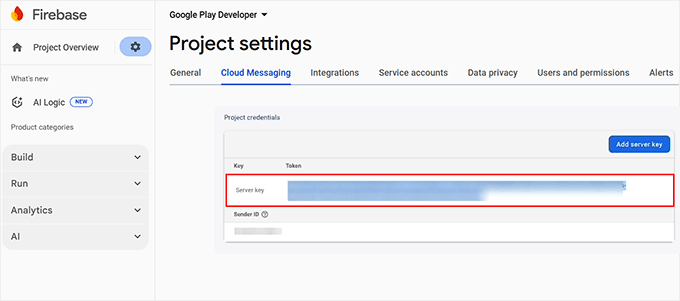
Once the project is set up, open it and click the gear icon at the top left corner to access its settings. Then switch to the ‘Cloud Messaging’ tab.
Here, you’ll find your Server Key. Simply copy it and paste it into your BuddyBoss settings page to link the two platforms.

3. Register Your Mobile Apps in Firebase
Next, go back to your Firebase Project Overview and open the ‘General’ tab. Scroll down to the ‘Your Apps’ section. This is where you’ll register your mobile apps.
You’ll need to create four apps in total: one main and one test version for both Android and iOS. Make sure the bundle IDs and package names match the ones you used in your BuddyBoss and developer account settings.
You’ll see platform icons here. Click the ‘Android’ icon to add your Android app and the ‘iOS’ icon to create your Apple app.


4. Create iOS and Android App Entries
If you’re creating a Firebase iOS app, enter your iOS Bundle ID, App Nickname, and App Store ID (you can find these in your Apple Developer account).
Then click the ‘Register App’ button.
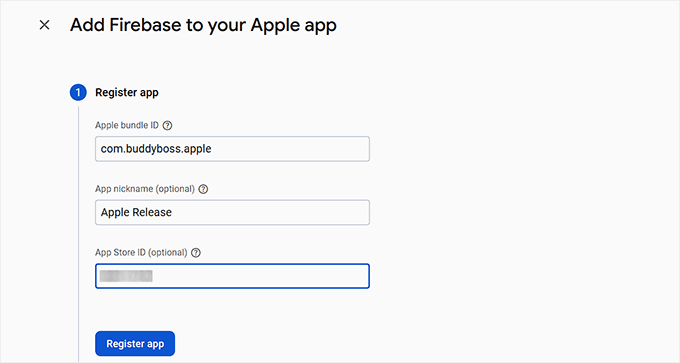

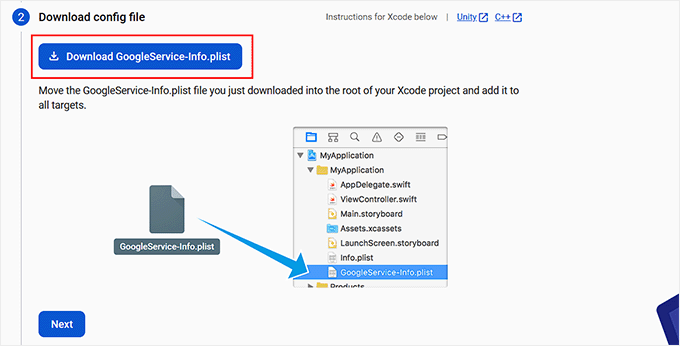
Firebase will ask you to download a configuration file. Go ahead and save it to your computer.
You’ll then repeat this process to create another iOS app, but this time add .test at the end of the Bundle ID (for example: com.yourappname.test). Register and download that one as well.
Follow the same steps for your two Android apps — one for production and one for testing — and download both configuration files.

5. Add iOS APN Authentication Key
Once you’ve created all four apps, go back to the ‘Cloud Messaging’ tab in Firebase. You’ll now see your iOS apps listed under the server key section.
To send push notifications to Apple devices, you’ll also need to add your APN authentication key. You can download this key from your Apple Developer account and then upload it here to Firebase.
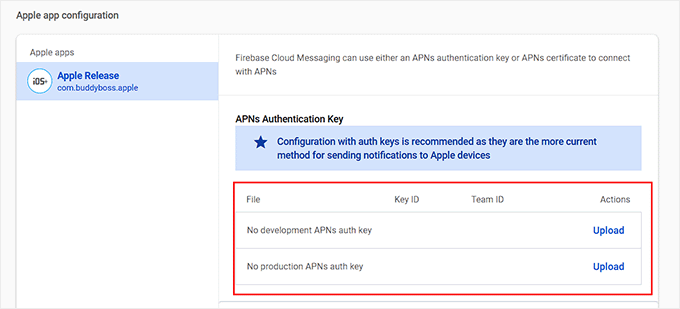

💡 Pro Tip: Before moving forward, double-check your Bundle IDs (for iOS) and Package IDs (for Android). If they don’t match exactly, Firebase will show errors, and your push notifications won’t work.
6. Upload Firebase Config Files to BuddyBoss
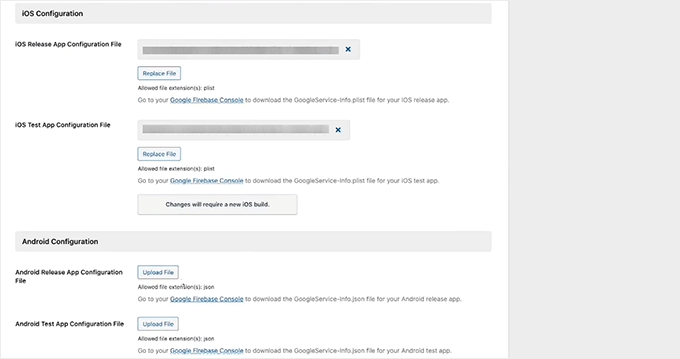
Finally, go back to your WordPress dashboard and upload all your iOS and Android configuration and test files that you downloaded earlier. Then click ‘Save Changes.’
That’s it — Firebase is now successfully connected, and your BuddyBoss app can start sending push notifications to your users on both iOS and Android.

Step 5: Customize Your App Settings and Notifications
Once you’ve set up push notifications with Firebase, it’s time to adjust some important app settings inside your BuddyBoss dashboard.
Go to the BuddyBoss App » Settings page. Here, scroll down and check the ‘Enable Registration’ box to allow non-members to create new accounts directly from the app.
Then, select your registration page from the dropdown. If you haven’t created a registration page with BuddyBoss yet, you can watch the tutorial linked there.
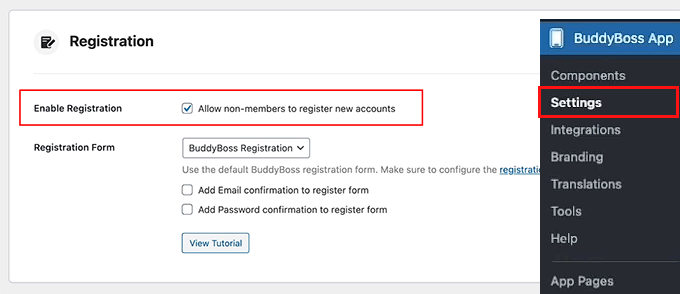

After that, check the box to send a confirmation email to users upon successful registration.
Next, check the ‘Privacy’ option to make your app accessible only to logged-in members. This means that only registered and logged-in members will be able to view your community.


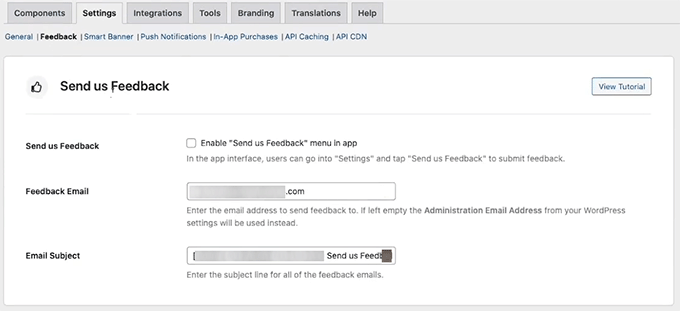
Next, open the ‘Feedback’ tab. If you’d like users to share their thoughts directly from the app, check the ‘Send Us Feedback’ option.
Make sure to also enter the email address where you want to receive these messages.

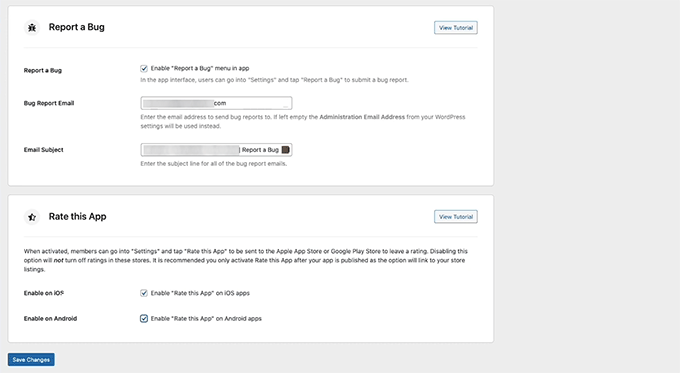
You can also enable a ‘Report a Bug’ menu so users can easily flag problems.
I also suggest adding the ‘Rate This App’ option for both iOS and Android.

After that, switch to the ‘Smart Banner’ tab. When this option is turned on, visitors browsing your website on a mobile device will see a small banner that promotes your app.
You can enable it for both iOS and Android. If you prefer, you can also restrict this banner so it only appears to logged-in members. Don’t forget to click ‘Save Changes’ once you’re done.


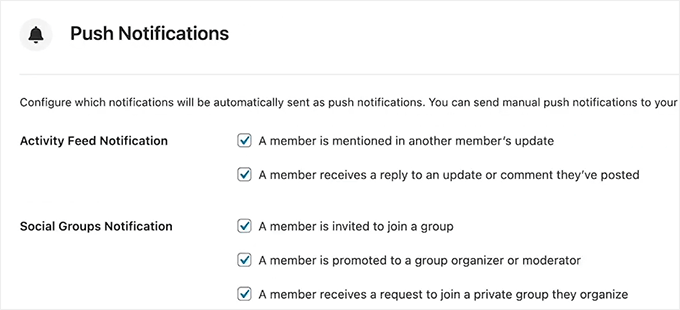
Finally, head over to the ‘Push Notifications’ tab. Here, you can choose which actions will trigger notifications.
For example, when a member is mentioned in a post, invited to join a group, or receives a reply. Just check the boxes for the notifications you want to enable and click ‘Save Changes’ again.

Step 6: Customize the Branding and Design of Your App
Now it’s time to make your community app truly feel like your brand. For this, go to the BuddyBoss App » Branding page in your WordPress dashboard.
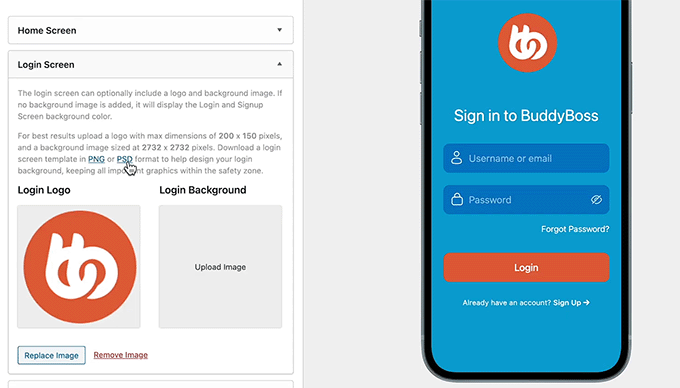
BuddyBoss gives you full control over how your app looks on mobile. You can upload logos for your home screen, login screen, launch screen, and more.
I recommend using the same logo or icon that you use on your website so that your community members instantly recognize your brand when they open the app.


For the login screen, you can also upload a custom background image.
Choose something that reflects your brand’s colors and style — it’s a small touch that helps make your app more memorable and professional.

Next, switch to the ‘Colors’ tab from the top.
From here, you can set your app’s background, alternate background, button, and accent colors. You can also customize colors for your navigation menu, top bar, buttons, and text to match your brand’s color palette.


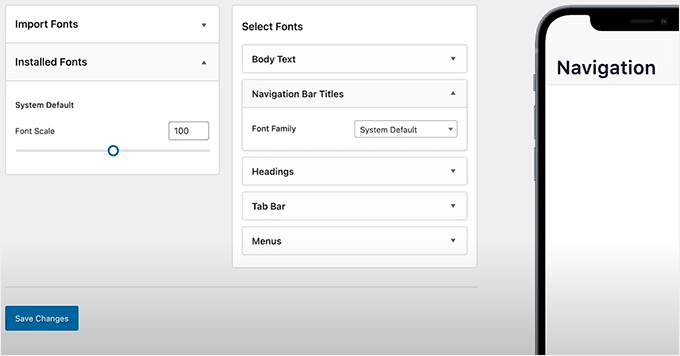
Then, open the ‘Typography’ tab. Here, you can choose different fonts for your body text, headings, top bar, and menus.
You can even adjust the default font size to make your text easy to read. When you’re done, don’t forget to click ‘Save Changes’ to apply your design.

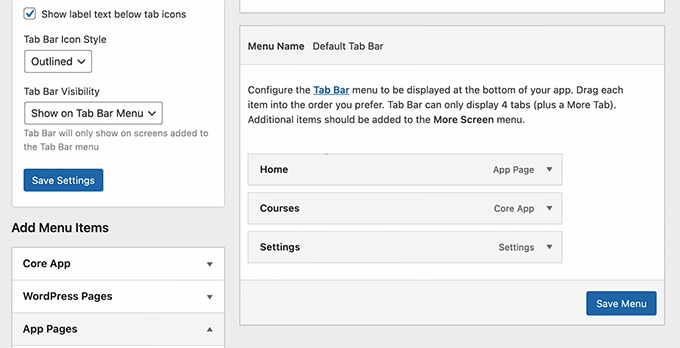
After that, head over to the ‘Top Bar’ page. This is the main navigation bar that appears at the top of your app.
I recommend adding your most important pages here, such as the Home, Profile, or Account page.

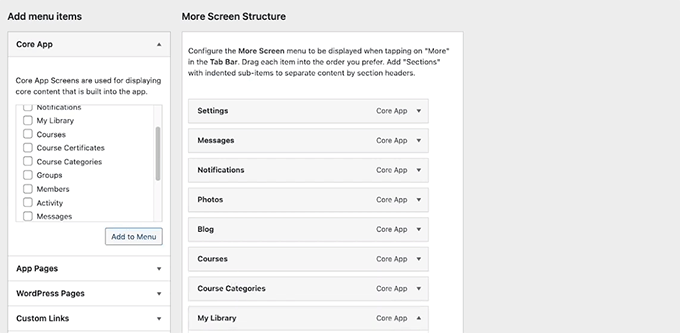
Then, switch to the ‘More Screen Structure’ from the dropdown menu. Here, you can add the rest of your pages — like Blog, Notifications, Activity, and Forums. These will appear when users tap the More icon in your app.
You can structure your app’s navigation just like you would create a menu in WordPress. If you need help, check out our tutorial on how to create a navigation menu in WordPress for guidance.

Step 7: Create Pages for Your App
Once your branding is ready, it’s time to start building the actual pages of your app.
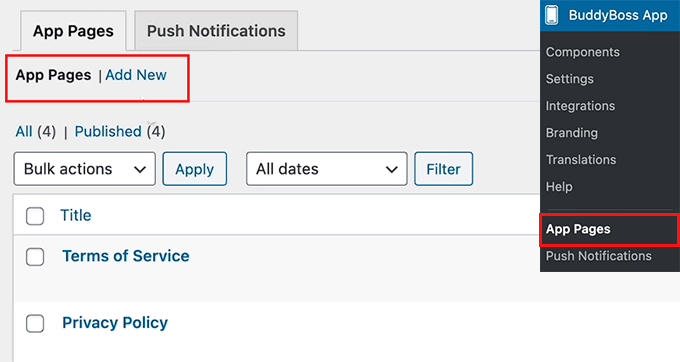
Head over to the BuddyBoss App » App Pages screen from your WordPress dashboard and click the ‘Add New’ button.

This will open the familiar WordPress block editor, where you can easily drag and drop blocks from the left column to design your mobile app page.
If you scroll down, you’ll also find special BuddyBoss blocks for things like Courses, Discussions, Forums, Groups, Members, Activity, Notifications, and Quick Links.
For example, if your community site already has an active forum, you can simply add the ‘Forum’ block so it appears right inside your app.
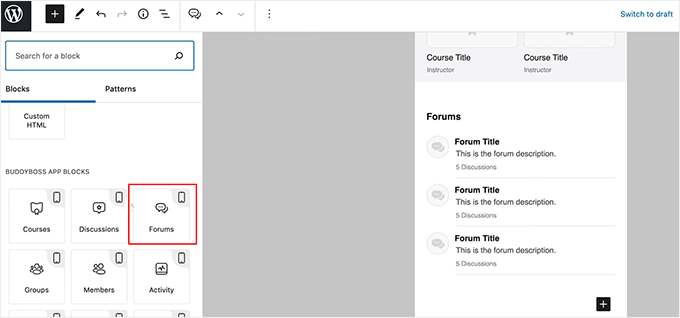

You can also use any other regular WordPress blocks, embed videos, add images, or include text—just like you would when creating a normal page.
Once you’re happy with how it looks, click the ‘Publish’ or ‘Update’ button to save your changes. You can now repeat the process to create as many app pages as you like.
Step 8: Build and Test Your Mobile App
You are now ready to build your app.
Go to the BuddyBoss App » Build page from your WordPress dashboard and click the ‘Request Build’ button.
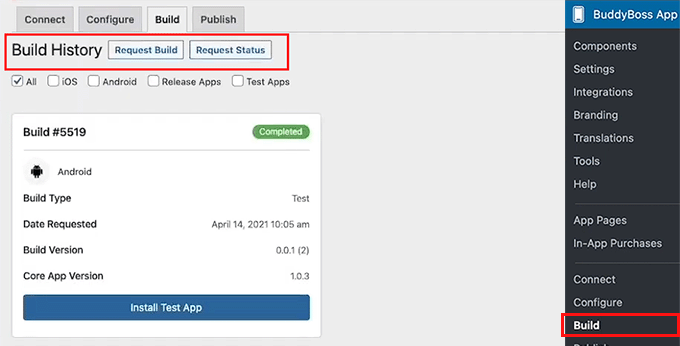

This will open a new screen where you need to select iOS and Android as your platforms.
Then, choose Release App and Test App as the build types. This basically tells BuddyBoss to create four versions of your app — a test and a release version for both iOS and Android.
The test app version is the one that can be instantly installed on your mobile phone using a QR code. It helps you see how your app looks and performs before you submit it to the app stores.
The release version, on the other hand, is the one you’ll upload to the Apple App Store and Google Play Store.
Once done, click the ‘Next Step’ button.


Next, BuddyBoss will show a summary of your app information.
Review it carefully to make sure everything looks right, and click the ‘Send Build Request’ button.
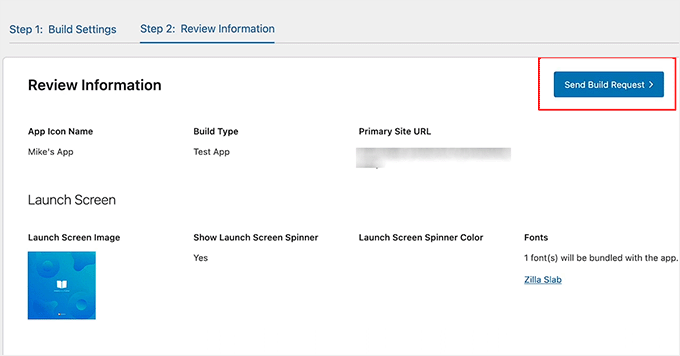

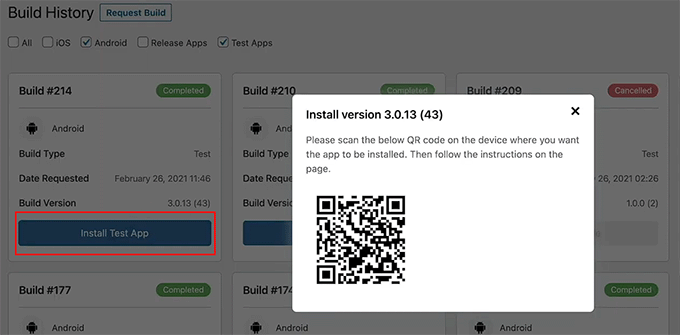
Your submission will now go to the BuddyBoss team, who will use their specialized system to generate your app builds. Once the process is complete, the status on this page will change to Completed.
When that happens, click the ‘Install Test App’ button. A popup will appear with a QR code that you can scan on your device to install and test your app right away.

🔍 What to Check in Your Test App (Before Submitting to App Stores)
Once you’ve installed the test version of the app on your phone, here are a few important things I recommend checking to make sure everything is working properly:
- Can you log in and register for a new account successfully?
- Do core community features (like the activity feed, forums, groups, or courses) load correctly?
- Are push notifications working? (You can test this by sending a message from another account or device.)
- Does the app’s branding match your settings? Check your logo, colors, and app icon to make sure they appear exactly how you designed them.
- Is the navigation smooth with no broken links or missing icons?
Making sure these items are functioning correctly will help you avoid rejections during the app store submission process.
Step 9: Submit Your App to the App Stores
Now that your app is built and tested, it’s time to upload it to the Apple App Store and Google Play Store.
To do this, switch to the ‘Publish’ tab at the top of your Build page. Then, choose Apple App Store and select the release version of your app from the dropdown menu.
Click the ‘Upload Build’ button to begin the submission process.


You can follow the same steps for Android by switching to the ‘Google Play Store’ tab.
Before you upload your app, make sure you’ve prepared everything the app stores require — including your app description, screenshots, and keywords.
These items will be shown on your public app listing and play a major role in helping users discover your app through search.
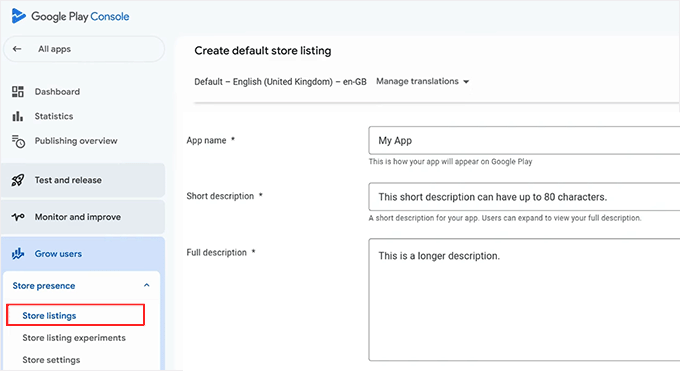
In the Google Play Console, you can enter this information by going to your dashboard, selecting your app, and opening the ‘Store Listing’ section.
From there, you’ll be able to upload screenshots, write your app description, and add keywords in the app details fields.

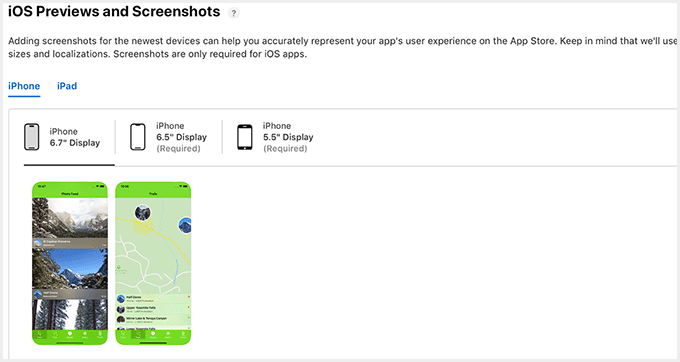
If you’re using the Apple App Store, you’ll enter this information in App Store Connect. Simply go to ‘My Apps’ and select your app.
Here, you can upload your screenshots, add your app description, and include relevant keywords to improve visibility in the App Store search results.

Once submitted, your app will go through a review process. It usually takes 2 to 7 days, but it can vary depending on the store’s review queue and your app’s complexity.
Don’t worry if your app doesn’t get approved the first time. It’s common for new developers to receive feedback or minor change requests. Both Apple and Google provide clear instructions on what needs fixing, and you can simply update your app and resubmit it.
After approval, your app will go live and be available for everyone to download.
💡 Bonus Tip: Keep Your App Updated
Publishing your app is not a one-time process. Just like your WordPress site, your app needs ongoing maintenance to stay compatible, secure, and user-friendly.
With BuddyBoss, minor changes you make on your WordPress site, such as updating content, posts, courses, or community activity, will sync to the app automatically. You do not need to republish your app for these types of updates.
However, suppose you make structural changes that affect the app’s functionality, such as enabling new BuddyBoss features, updating APIs, changing your app branding, or adding new plugins that integrate with the app.
In that case, you will need to generate a new build and resubmit it to the Apple App Store and Google Play Store.
This ensures your users always get the latest version and the app doesn’t break due to unsupported changes.
Frequently Asked Questions About Turning a WordPress Website into an App
Now that you know the full process of turning a community website into a mobile app, here are some common questions I often hear from beginners like you:
How long does it take to build an app?
Creating an app from your WordPress website using BuddyBoss will take around one hour for the initial setup and configuration. However, the entire process from start to finish, including waiting for Apple and Google to review and approve your app, can take several days.
Can I use the BuddyBoss App with any WordPress theme?
Yes, you can use other WordPress themes, but the BuddyBoss App works best with the BuddyBoss Theme. It is designed to fully sync your community features, courses, and content with the app. Using another theme may cause missing features or broken functionality.
What happens if I cancel my BuddyBoss App subscription?
If you cancel, your app will stop receiving updates, and you won’t be able to publish new versions. Existing app installations will continue working, but any new features, bug fixes, or store integrations will no longer be available.
How are content updates handled in my WordPress app?
Content updates on your WordPress site automatically sync with your BuddyBoss App. This includes posts, pages, courses, forums, and community activity. This keeps your app always up to date without any extra work.
Do I need coding knowledge to create a mobile app for my WordPress site?
No coding is required. BuddyBoss handles the heavy lifting, and you just need to set up your app in the dashboard, configure iOS and Android settings, and customize your branding. This makes it accessible for anyone, even beginners.
I hope this article helped you learn how to easily turn your WordPress website into a mobile app. You may also want to see our beginner’s guide on how to add a private messaging system in WordPress and our comparison of BuddyBoss vs. Circle, vs. Mighty Networks.
If you liked this article, then please subscribe to our YouTube Channel for WordPress video tutorials. You can also find us on Twitter and Facebook.

