How I Block Email Address Entries in My WordPress Forms
I’ve built all kinds of WordPress forms over the years, from surveys and contact forms to email newsletter signups. But even with CAPTCHA and other anti-spam tools in place, my inbox kept filling up with junk submissions.
When I finally took a closer look at the problem, I noticed a clear pattern: most of the spam submissions were coming from fake or suspicious email addresses.🔍
That’s when it hit me: instead of cleaning up spam after it happens, why not stop it before it even reaches the form? Blocking these bad email addresses directly turned out to be the simplest fix.
After testing several methods, I found one that works best. It’s saved me hours of cleanup and keeps my forms organized.
This approach filters out disposable email services, competitor domains, and obvious spam patterns so you can take full control of your form submissions.
Let me show you exactly how to set it up on your own site.

TL;DR: I use the Allowlist/Denylist feature in WPForms to block email entries from disposable email providers (like mailinator.com), specific countries, and personal email addresses. This allows me to reduce my contact form spam.
Why Block Spam Email Addresses in WordPress Forms?
Blocking spam email addresses in your WordPress forms is a powerful way to prevent junk submissions from filling up your inbox.
By stopping fake and disposable emails before they get through, you can protect your inbox, improve email deliverability, and ensure the leads you collect are high-quality.
Here’s a closer look at why this matters:
| Benefit | Explanation |
|---|---|
| Prevent Inbox Flooding | Fake form submissions make it harder to manage real entries. Blocking unwanted emails at the source keeps your inbox clean, so you can focus on genuine leads and respond faster. |
| Protect Email Deliverability | Sending emails to invalid addresses increases bounce rates, which can damage your sender reputation. |
| Focus on Real Users | You can allow business emails (like @company.com) while blocking disposable addresses (@tempmail.com). This ensures that only valid submissions from serious users get through. |
Now, I’ll show you how to block unwanted email entries in your WordPress forms, step by step:
How to Block Email Addresses in WordPress Forms (Step by Step)
The easiest way I found to block unwanted email addresses in my WordPress forms is by using the Allowlist/Denylist feature in WPForms.
WPForms is the best contact form plugin for WordPress, offering powerful features to block contact form spam submissions. Apart from the Allowlist/Denylist feature, it also includes CAPTCHA, modern anti-spam protection, and customizable spam filters.

What makes the Allowlist/Denylist feature so useful is that it allows you to control who can submit your forms:
- Allowlist: Only specific email addresses or domains are accepted. This is perfect if you want tighter control, like only allowing your team’s
@company.comemails or limiting access to a small group of real users. - Denylist: Block spammers, disposable domains (like
@tempmail.com), or any email addresses you don’t want filling up your inbox.
We use WPForms on WPBeginner and all our business websites, and it allows us to easily manage contact form submissions and our annual reader surveys. For more details, you can see our complete WPForms review.
Step 1: Install and Activate the WPForms Plugin
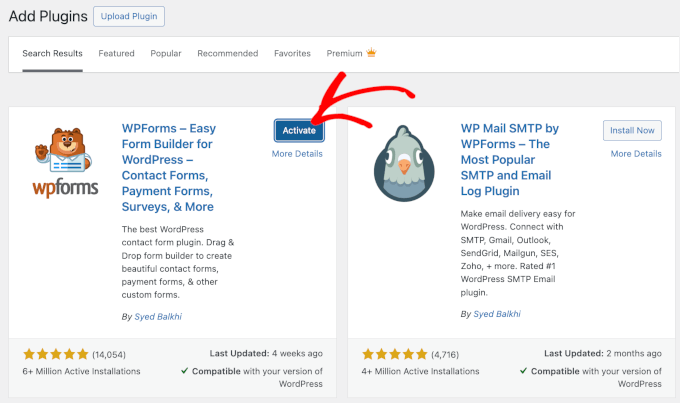
First, you need to install and activate the free WPForms plugin on your website.
From your WordPress admin area, go to Plugins » Add New and type ‘WPForms’ into the search bar. After that, click ‘Install Now’, and once it’s installed, click the ‘Activate’ button.

👉If you’d like step-by-step instructions, we’ve also written a detailed guide on how to install a WordPress plugin.
🚨Note: The Allowlist/Denylist feature is available in the free version of WPForms, so you can start using it right away.
However, for features like smart conditional logic, payment form integrations, or 2000+ form templates, you’ll want to upgrade to WPForms Pro.
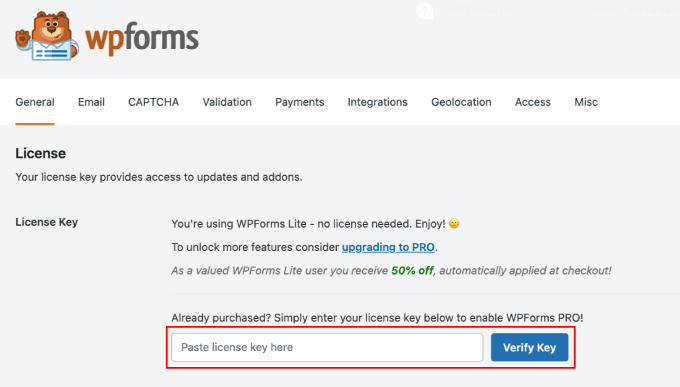
If you decide to go with WPForms Pro, you’ll also need to verify your license key.
You can do this by going to WPForms » Settings » General in your WordPress dashboard and pasting the license key from your WPForms account. Just click ‘Verify Key’ to complete the process.

Step 2: Edit Your Form and Find the Email Field
After activating the tool, head over to the WPForms » All Forms page in your WordPress dashboard and click ‘Edit’ under the form’s name.
This opens the form inside the drag-and-drop builder.


If you don’t already have a form set up, then head to WPForms » Add New Form instead.
Here, you’ll find dozens of premade templates for contact forms, surveys, order forms, and more. I personally find these templates really helpful because they save a lot of setup time.
I’ve also tried the AI form builder, and I liked how it instantly generated a working form just from a short description.


Once your template is open, you can add new fields, delete ones you don’t need, and rearrange everything with just a few clicks.
📖 If you’re new to WPForms, here are some helpful tutorials to guide you through creating different types of forms:
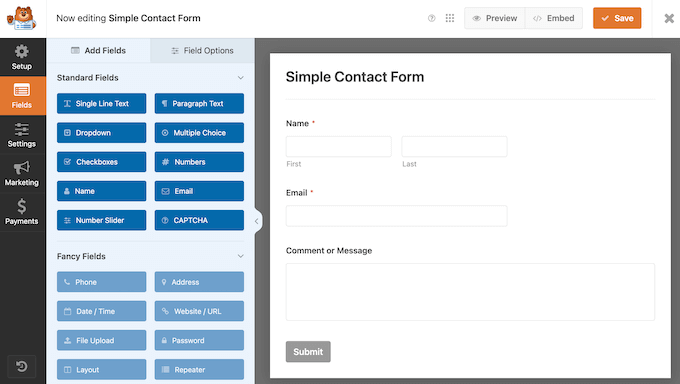

Finally, make sure to locate and add the ‘Email’ field in the visual editor, since that’s where you’ll set up the allowlist or denylist in the next step.
Step 3: Use Allowlist and Denylist Rules
After setting up the Email field in your form, click on it to open its settings in the left column.
Once you are there, switch to the ‘Advanced’ tab and scroll down to the ‘Allowlist/Denylist’ option.
By default, it’s set to ‘None’, which means anyone can submit the form. But since you want more control over your form entries, you can switch to ‘Denylist’ or ‘Allowlist.’
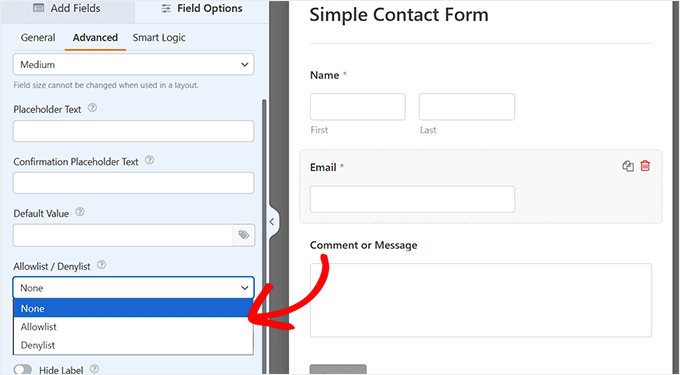

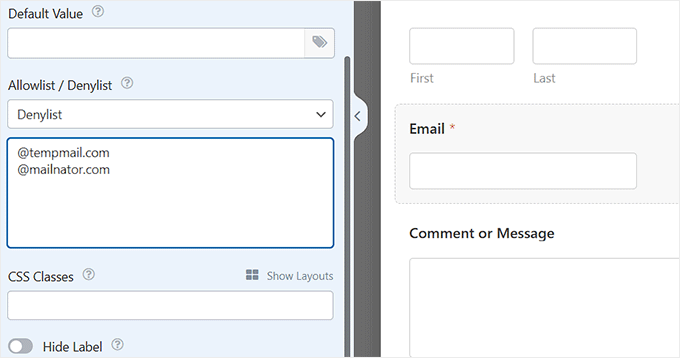
If you choose the ‘Denylist’ option, then the email addresses or domains you enter will be blocked from submitting your form. This is useful when you want to prevent spam or block specific types of addresses.
For instance, I once blocked disposable email providers that were cluttering my form entries.
Here are some common ways you can use the Denylist:
- Block disposable email providers – Prevents people from using temporary or one-time email addresses, like *@mailinator.com. These emails are created to bypass signups or submit spam.
- Block personal email services for business forms – Helps ensure only company emails can be used. For example, you could deny *@gmail.com.
- Block emails from specific countries – You can block emails ending in a specific country’s domain, like
*.cnfor China or*.rufor Russia.
⚠️Friendly Warning: Be careful when blocking major email providers like Gmail or Yahoo. While it can be helpful for specific forms, you could prevent real customers from contacting you.
I only recommend doing this if you are sure you only want business emails.

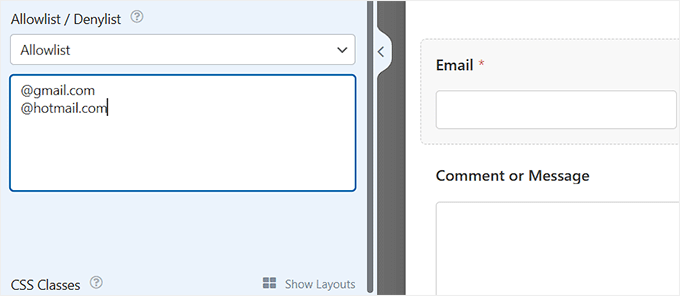
If you choose the ‘Allowlist’ option, then only the email addresses or domains you enter in the text box will be able to submit the form.
This is even stricter because it rejects everything else by default. Here are a few ways you might use the Allowlist:
- Limit submissions to partner organizations – For example, *@partner.org ensures only your trusted partners can access the form.
- Restrict forms to employees only – Allow only *@company.com to make sure only your team members can submit the form.
- Only accept local customers – Using *.uk lets you accept email addresses from U.K.-based users only.

💡 Pro Tip: How to Use the Asterisk (*) Correctly
When adding entries to your Allowlist or Denylist, you can use an asterisk (*) as a wildcard.
This tells WPForms to block or allow any email address from a specific domain (e.g., *@spammydomain.com matches all emails from spammydomain.com).
Without an asterisk, the rule will only block a single, specific email address (like spammer@example.com).
For example, you can get a head start on blocking common disposable email services by adding these to your denylist (one per line):
*@mailinator.com*@temp-mail.com*@10minutemail.com
I recommend using the Denylist in most cases because it provides flexibility to block unwanted addresses while still allowing legitimate users.
With the Allowlist, you risk blocking people you may actually want to hear from, unless you keep it updated constantly.
When you’re done setting your rules, click the ‘Save’ button at the top to apply the changes.
Step 4: Add Your Form to Your Website and Test It
Once you’ve clicked ‘Save’ in the WPForms builder, your updates are ready to go. If you’ve already added the form to a page, the changes will update automatically.
But if you haven’t added the form yet, don’t worry—WPForms comes with a built-in block that makes it super easy to embed your form into any page or post you like.
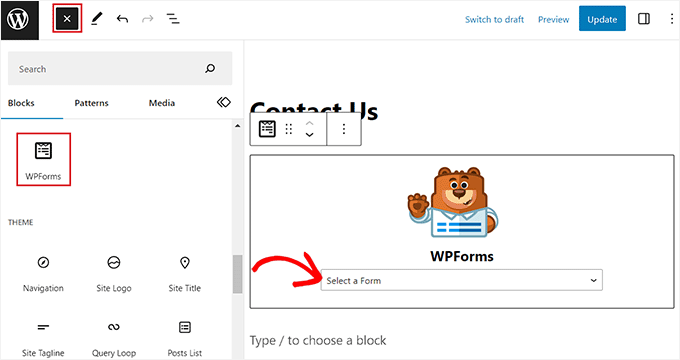

For a detailed walkthrough, you can see our tutorial on how to embed WordPress forms.
Next, click the ‘Preview’ button at the top to see the form in action.
This step is important before publishing because it lets you test whether your Allowlist and Denylist rules are working as expected.
Start by submitting the form with an email address from a domain you’ve denylisted, such as test@spammydomain.com.
You will now see an error message that says, “This email address is not allowed.”
Then, try submitting the form with your own personal email address, and it should go through successfully without any errors.
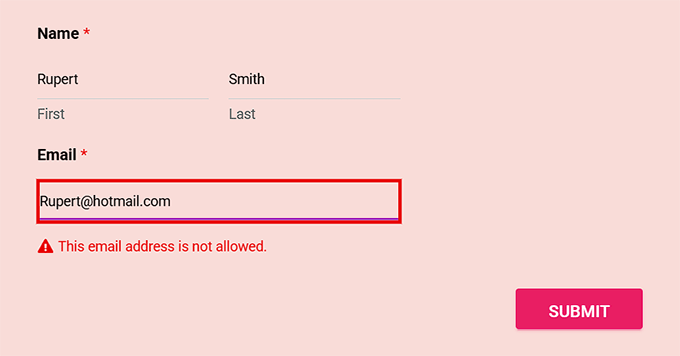

Running these tests lets you make sure everything is working correctly and gives you confidence that both your Allowlist and Denylist rules are doing their job.
💡 Expert Tip: If you don’t see the error message when testing, double-check your denylist entries for typos or extra spaces. Even small formatting mistakes can stop the filter from working.
Once you’ve confirmed everything is working, go ahead and publish or update the page. Your form is now live and ready to filter submissions exactly as you intended.
FAQs About Blocking Email Addresses in WordPress Forms
Blocking email addresses in WordPress forms can raise a few common questions, so I wanted to answer them here based on my experience using WPForms.
Can I block Gmail or Yahoo email addresses in my form?
Yes, you can use the denylist to block specific domains like @gmail.com or @yahoo.com if needed. Just remember to include the asterisk (*@gmail.com) so the rule applies to all emails from that domain.
Can I only allow company emails in my form?
Absolutely. Using the allowlist, you can restrict submissions to specific domains, such as *@company.com. This ensures only your team or approved business users can submit the form.
It’s especially useful for internal surveys, employee feedback forms, or any situation where you only want submissions from verified company email addresses.
Will blocking emails in WordPress forms hurt my real users?
Not if you set it up carefully. I recommend using the denylist as your main filter since it blocks only the emails you specify. Allowlist is stricter and can sometimes reject users you might want to allow, so it’s best used only in specific cases.
I hope this article helped you learn how to easily block email address entries in WordPress forms. You may also want to see our guide on how to auto export form entries in WordPress and our expert tips on ways to use conditional logic in WordPress forms.
If you liked this article, then please subscribe to our YouTube Channel for WordPress video tutorials. You can also find us on Twitter and Facebook.

